Day 5: Drag and Drop Grid
Today we finished implementing the UI Toolkit tutorial to create a drag and drop inventory. Then, we refactored that implementation to be linked with a CraftingContainer such that it renders a grid with both valid and invalid positions.
Table of contents
Today’s Goals
-
Finish Inventory Drag and Drop Tutorial -
Update Grid to display based on Crafting Container Grid
Finishing Inventory Drag and Drop Tutorial
Recall from Day 4 that we began to learn about how to use the new UI Toolkit to create a rich user interface. To do this, we followed a tutorial on creating a grid based, drag and drop inventory: LINK
Of course, Captain Coder doesn’t just follow a tutorial! Instead, we made it our own. To do this, we first used Leonardo.AI to generate a few assets for us which would represent the Boat, Wood, and Rope items we created using ScriptableObjects:


Next, we added a Sprite property to the ItemData ScriptableObject:
public class ItemData : ScriptableObject, IItem
{
    [SerializeField]
    private string _name;
    public string Name => _name;

    [field: SerializeField]
    public Sprite Sprite { get; private set; }
}
With a serialized Sprite property, we were able to specify the sprite for each instance of ItemData:
As a quick hack to continue working on the grid, we implemented a very simple ItemDatabase ScriptableObject that had a reference to each of the ItemData instances we created:
public class ItemDatabase : ScriptableObject
{
    [field: SerializeField]
    public ItemData Boat { get; private set; }
    [field: SerializeField]
    public ItemData Rope { get; private set; }
    [field: SerializeField]
    public ItemData Wood { get; private set; }
}
With this defined, we were able to hard code the interface to populate such that the first three cells contained the items:
For a full explanation on how this works, you can follow the tutorial here: LINK
Update UI to Display a Crafting Container Grid
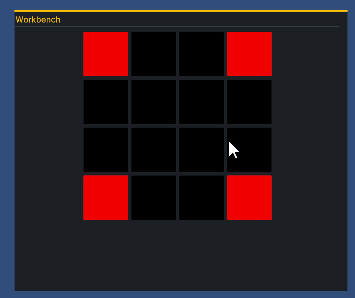
Recall from day 1 that we would like to have Crafting Containers that have arbitrary 2D grid shapes (e.g. InvalidPositions). On day 4, we created an instance of the CraftingContainerData ScriptableObject for a “Wood Working” station that is a 4x4 grid such that each corner of the grid cannot be used for crafting.
We modified the code to include a reference to a CraftingContainerData that is used in the UI’s Awake method to construct the GridSlots and specify if the slot is invalid:
public class CraftingContainerUIController : MonoBehaviour
{
  private void Awake()
  {
    // Acquire the set of invalid positions
    HashSet<Core.Position> invalidPositions = CraftingContainer.InvalidPositions;
    for (int r = 0; r < CraftingContainer.Rows; r++)
    {
        // Creates a row for each row in the CraftingContainer
        GridRow row = new ();
        // and adds it to the UI
        m_SlotContainer.Add(row);
        for (int c = 0; c < CraftingContainer.Columns; c++)
        {
            // Construct a GridSlot specifying if it is invalid or valid
            GridSlot slot =
              invalidPositions.Contains(new Core.Position(r,c)) ? new GridSlot(true) : new GridSlot();
            GridSlots.Add(slot);
            // and add it to the row
            row.Add(slot);
        }
    }
}
Additionally, we added a styling for the GridSlot when it is valid / invalid. The result can be seen below:

With a much better understanding of the new UI Toolkit, we are ready to wire up our crafting system in the next two days! We are super close!
Join the Discussion
Before commenting, you will need to authorize giscus. Alternatively, you can add a comment directly on the GitHub Discussion Board.